Refining your DeepLabCut Model – Learning from Mistakes
How to re-train your old model with new data using jupyter notebooks
Overfitting or generalizing, that is the question. In other words, what do you want to use your DLC model for? If you want to label many videos from a similar setup, an overfitted model will do very well (until you change the camera perspective, lighting conditions or maybe even the subject). On the other hand, if you want a model that detects human facial landmarks in different subjects, from different genders and ethnicities, with different facial hair styles, and specially from different angles, like we do now, then you need a model that generalizes well to all of these conditions.
If you still need to install DeepLabCut, check out this guide on Installing DeepLabCut and this short example on Training your first DeepLabCut Model. As always, check the ever-expanding DeepLabCut documentation on Github for further details.
The Starting Point
In this example we will start with a trained DLC model to detect facial landmarks, overfitted to a single subject, me. We will then try to analyze new videos from different subjects of different genders and ethnicities. We will extract outliers from these misdetections, refine them manually and re-train the model. Last, just for some extra fun, I will use Anipose to triangulate multiple camera perspectives into a final 3D facial expression for each subject.
The original model was trained on 120 labeled frames from 6 different camera angles of a single subject. And it just works great - see for yourself in the video below!
It was to be expected, though, that this model wouldn’t generalize well to new subjects, some wearing glasses and different hair styles covering different parts of the face. But we can make use of this fact and check exactly when the model struggles the most. Then, we can refine a few of those outlier frames and re-train the model with the information that was apparently missing before.
A step by step guide for this example is provided as jupyter notebook, check it out and tag along!
Note: In Windows machines you may experience some permission issues trying to extract frames and adding new videos to your project. Just to be sure, try starting the terminal with elevated privileges before activating your environment and starting jupyter notebook.
Step 1: Old Model on New Data
First, start deeplabcut in your prefered mode, either as graphic user interface or command line. I will use a jupyter notebook myself, but the same steps should work over the GUI as well. Initialize the previous project by setting the path to the corresponding config.yaml file and starting a list with new videos, in this case 30 new videos from 5 different subjects:
import deeplabcut
path_config_file = 'D:\FacialExpression\old-DLC-Project\congif.yaml'
new_videos = ['D:\FacialExpression\new-videos\subject1_cam-A.avi',
              'D:\FacialExpression\new-videos\subject1_cam-B.avi',
              ...,
              'D:\FacialExpression\new-videos\subject5_cam-F.avi']
We will then use the following commands to analyze the new videos with our previously overfitted model:
deeplabcut.analyze_videos(path_config_file, new_videos, shuffle=1, save_as_csv=True, videotype='mp4')
deeplabcut.create_labeled_video(path_config_file, new_videos, videotype = 'mp4', save_frames=False)
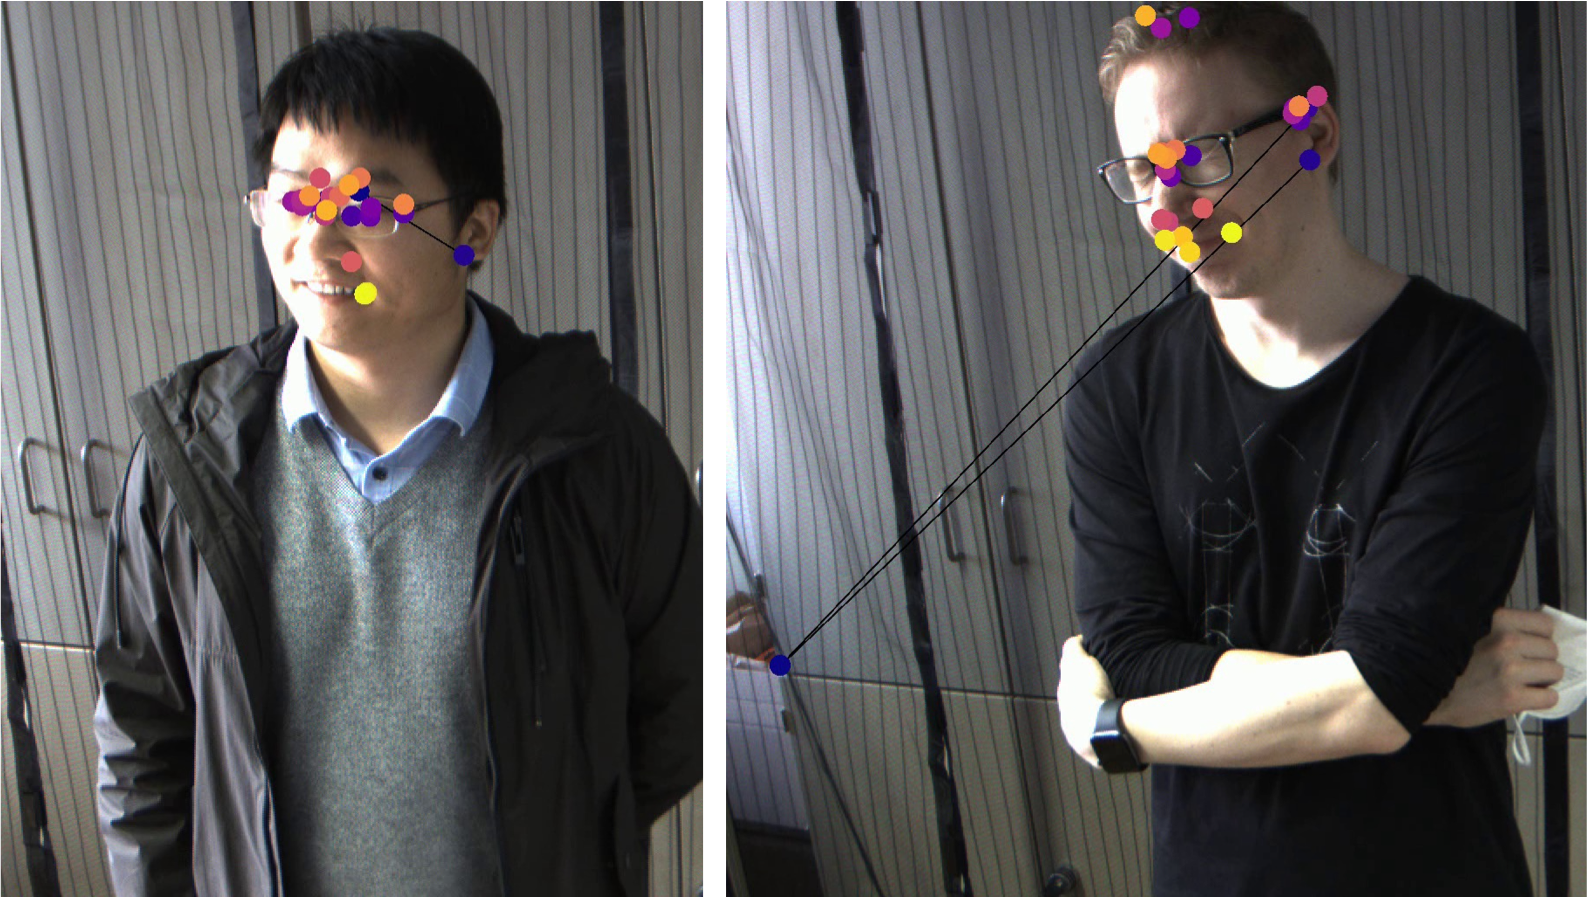
And of course, we won’t be too sad about the fact that DeepLabCut struggles to find my nose and my eyebrows in others’ faces. See for example how tracking collapses into the nose and eyes region on the left, and struggles with blond hair on the right.
Step 2: Finding Errors
We will extract these poorly tracked outlier frames, refine them manually, and feed them back to the training dataset for re-training. To keep it (relatively) simple, I will only be extracting 5 frames from each video, because a total of 150 manually labeled frames from 30 new videos seems enough. Open your config.yaml file and set the number of frames to pick to whatever you want, in this case numframes2pick:5. Keep in mind that manually labeling frames is work for you, while training the model and analyzing videos is the machine’s work. I would recommend refining the model labeling only a few outlier frames and see what happens. If the model still struggles, you can refine it over and over again, extracting some new outliers, instead of extracting too many at once.
deeplabcut.extract_outlier_frames(path_config_file, new_videos, automatic=True)
The function above will look for outliers in the tracked coordinates and ask for user feedback to start extracting these outlier frames from the video file. If you don’t want to monitor every single outlier extraction, make sure to pass automatic=True to the function above. The extracted frames are stored in the subdirectory labeled-data in your DLC project folder, and the path to the respective video should be included in the config.yaml file. At this point you could get an error message like this telling you that saving the video path failed. In this case, you need to add the new video paths manually for DLC to include these in the new training set. You can either add them by hand, writing in the config.yaml file in the same format as the first video paths (see here), or you can run the following command to add the list of videos to your config file:
deeplabcut.add_new_videos(path_config_file, new_videos, copy_videos=False)
If the permission error persists, try starting a new anaconda terminal as administrator (right click > run as administrator) and then starting jupyter notebook with elevated privileges.
Step 3: Fixing Errors
After extracting the outlier frames, your actual work can begin. The function below starts a graphical interface to refine labels manually:
deeplabcut.refine_labels(path_config_file)
First, you need to load the directory with frames you want to refine, and then load the corresponding .h5 file with the outlier predictions from the previous model. You are asked to define a likelihood threshold, but don’t worry too much about it - this is only to show you which labels have an especially low prediction. Labels with a likelihood higher than your threshold will appear as opaque colored circles, while labels below the threshold will appear as transparent colored circles. As I am going to refine all labels, and I recommend you do the same, I like setting the threshold to 1 to display all markers transparent. This makes it somewhat easier to place the center of the marker when you zoom in.
The refining process is overall very similar to labeling, except that the labels are already placed somewhere in the frame. You drag them holding the left mouse key and drop them in place. Delete labels that are not supposed to be in the frame by clicking the mouse wheel. Make sure to delete all labels that are not visible and suppress your ‘knowing’ where the eyebrow is behind that strand of hair: if you don’t see it, don’t label it. A minimal difference from the original labeling process is the fact that instead of saving and quitting to go on labeling other files, you will be prompted to refine other files directly after clicking save. The Quit button will close the GUI without redirecting you to new files… and that may cause your notebook to crash. In that case try restarting the kernel from your jupyter notebook.
Step 4: Learning from Mistakes
After refining all the outlier frames extracted above, merge the dataset to combine these new labels with the labeled data from your previous model and create a new training data set:
deeplabcut.merge_datasets(path_config_file)

deeplabcut.create_training_dataset(path_config_file, net_type='resnet_50', augmenter_type='imgaug')
Note: This step will only work if the links to the new videos are included in the config.yaml file (see permission issues here and here). Otherwise, you will just duplicate the previous training dataset, and spend several days training a new model that turns out to be exactly the same as the old one. It happened to a friend of mine.
To start re-training the previous model, we would go in the dlc-models directory, go to the iteration of the previous model, find the train subdirectory, and look for the latest snapshot, e.g., snapshot-1030000. Then, go to the newest iteration in the dlc-models directory, go to the train directory and open the pose_cfg.yaml file. Edit the parameter init_weights to add the last snapshot without any filetype ending. It should look something like this, applied to your directory or course:
pose_cfg.yaml :
# instead of using pretrained resnet_50
init_weights: C:\Users\hidalggc\Anaconda3\envs\DLC-GPU\lib\site-packages\deeplabcut\pose_estimation_tensorflow\models\pretrained\resnet_v1_50.ckpt

# use own pretrained model
init_weights: D:\FacialExpression\old-DLC-Project\dlc-models\iteration-0\DLCApr14-trainset95shuffle1\train\snapshot-1030000
Finally, you can re-train the model with your new extended labeled dataset as follows:
deeplabcut.train_network(path_config_file, shuffle=1, displayiters=100, saveiters=1000)
Note that I use a GPU on my local machine. If you are working with a CPU and outsource training to google colab, now would be the time to do so. Check the last blogpost on Training your first DeepLabCut Model for an example on how to migrate you project for cloud computing.
At Last
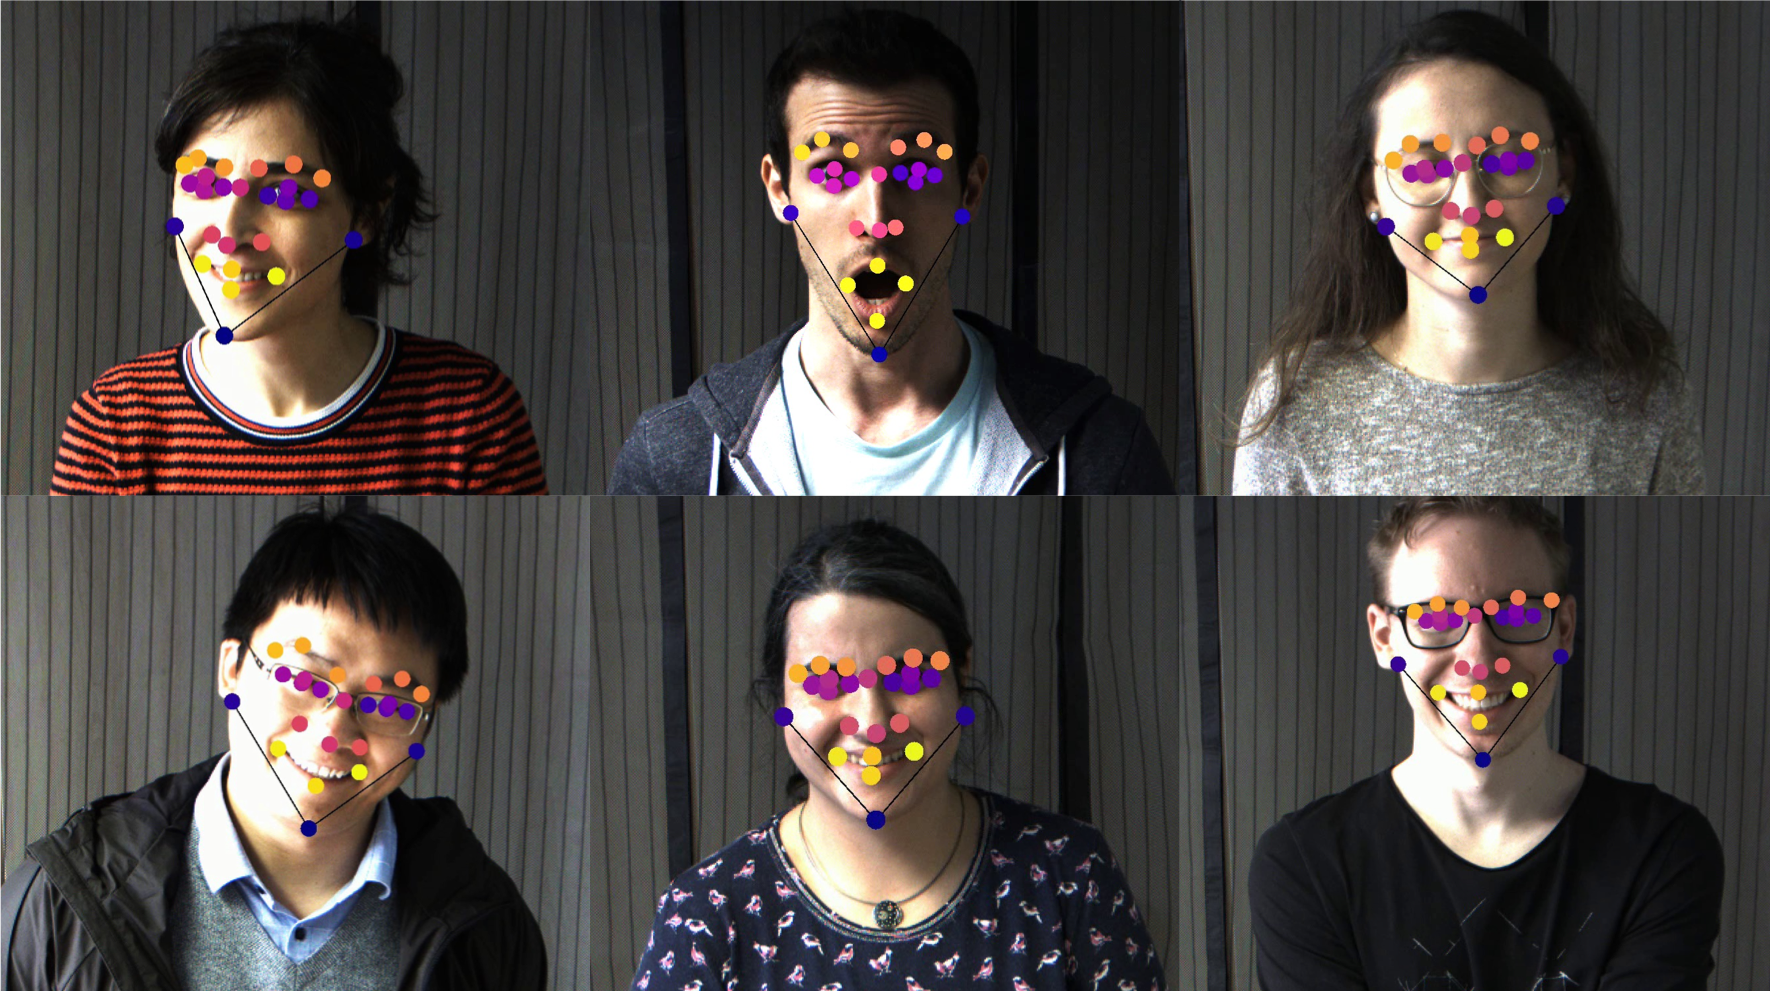
The result is a DLC model trained over two iterations on 270 labeled frames from 6 different camera angles and 6 different subjects: three females and three males, representing nationalities from Germany, Spain, Turkey, Iran, and China.
We will run the functions below once again to analyze the final data with the newly refined model, to see how it generalizes to different subjects:
deeplabcut.analyze_videos(path_config_file, test_videos, shuffle=1, save_as_csv=True, videotype='mp4' )
deeplabcut.create_labeled_video(path_config_file, test_videos, videotype = 'mp4', save_frames=False)
A little Extra
Recording the same scene from multiple camera angles turns out to have several benefits. First, different angles provide multiple training examples from the same recording. Second, multiple angles avoid occlusion, e.g., when subjects roll their eyes behind your back. At least one camera will catch that. And last but not least, the original reason to record from multiple camera angles was to allow 3D triangulation from the different 2D images. This next process will be covered in detail in a separate post, but for now you can lie back, start reading about Anipose and enjoy the 3D tracked facial expressions below.
A big fat Thank you to Neslihan, Julian, Sevim, Mengmeng and Alaleh, for helping out with data collection and their beautifully diverse facial expressions.
Let me know on Twitter if you found this guide useful or would like to have a more detailed discussion on any of the methods used above.
Guillermo Hidalgo Gadea
PhD Student in Psychology
My research interests include embodied cognition, animal behavior and machine learning.